AuthorKhalid WheelsReading 9 minViews142Published by
Even experienced drivers can get momentarily confused about which battery terminal is positive and which is negative. Knowing the difference is crucial for safe jump-starts and battery maintenance — especially in a hot climate like Dubai, where battery issues can strike unexpectedly. Mixing up the terminals can lead to dangerous sparks or damage to your car’s electrical system. In this article, we’ll explain how to identify the positive and negative terminals on a traditional car battery, compare their key characteristics, and outline safe practices for handling battery connections. By the end, you’ll have the confidence to deal with your car battery safely and correctly.
Identifying the Positive and Negative Battery Terminals
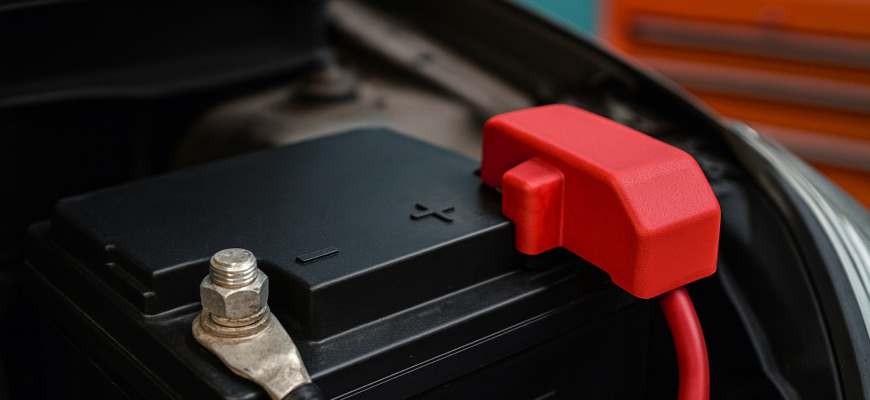
Car batteries are designed with clear markings to indicate polarity. Most batteries have a plus (+) sign stamped near one terminal and a minus (–) sign near the other. The “+” denotes the positive terminal and the “–” denotes the negative terminal. These symbols are often accompanied by color coding: red for positive and black for negative. In fact, the American Automobile Association (AAA) notes that “usually, the terminals are red or black and you will see a + (red) and – (black) sign on the top”. Many car batteries also have a red protective cover over the positive terminal to prevent accidental short-circuits. (The negative terminal typically has no cover, since touching the grounded negative post with metal doesn’t cause a short in the way contacting the positive post does.)
While color is a helpful guide, do not rely solely on cable color, because not all battery cables follow the red/black convention. The positive cable is often red, but it could be a different color or simply dirty and hard to distinguish. Always double-check for the “+” or “–” markings on the battery case near the terminals. Another clue is the wiring: the negative terminal is usually connected directly to the car’s metal chassis or engine block (ground), whereas the positive terminal connects to the starter or fuse box. Additionally, on standard top-post batteries, the positive terminal post is slightly larger in diameter than the negative post — an industry standard feature designed to prevent mix-ups. If one post seems a bit bigger, it’s likely the positive side.
Quick ways to identify battery terminals:
Look for symbols: Positive has a “+” sign, negative has a “–” sign, usually molded into the battery casing.
Check cable and cover color: Positive is often red (or has a red cover), negative is often black. (Remember that color alone can be misleading if cables are replaced or dirty.)
Compare terminal sizes: The positive post is usually slightly larger than the negative post on traditional automotive batteries.
Trace the cable: The cable from the negative terminal typically bolts to the vehicle’s frame or engine (ground). The positive cable goes to the starter or power distribution box.
By using a combination of these cues, drivers can confidently distinguish the positive vs. negative terminal on their car battery.
Positive vs. Negative Terminal: Key Differences
Both battery terminals are critical for your car’s electrical system, but they serve opposite functions. The positive terminal is the source of electrical current, and the negative terminal is the return path to the battery (ground). The table below highlights the key differences between a car battery’s positive and negative terminals:
Aspect
Positive Terminal (+)
Negative Terminal (–)
Polarity Marking
Marked with a plus “+” sign (sometimes “POS”)
Marked with a minus “–” sign (sometimes “NEG”)
Cable Color (Typical)
Red (often has a red cap or cover)
Black (usually no cover on terminal)
Connection
Connects to the vehicle’s electrical system (starter, alternator, fuse box, etc.)
Connects to the vehicle’s chassis/engine (ground) providing return path to battery
Terminal Post Size
Slightly larger diameter post on standard batteries
Slightly smaller diameter post in comparison
Alternate Names
“Positive,” “Plus,” or “Hot” terminal
“Negative,” “Minus,” or “Ground” terminal
Safety Consideration
If this terminal contacts the car’s metal frame, it will short-circuit (sparks, hazards)
This terminal is at ground potential; connecting it to chassis is normally safe (already grounded)
As shown above, positive (+) is associated with red color and a larger post, and it feeds power into the car’s systems. Negative (–) is associated with black color and grounding the circuit. One practical implication of these differences is the risk of short-circuit: if a metal tool bridges the positive terminal to any grounded metal part of the car, it will create a dangerous spark and possibly blow fuses or damage electronics. In contrast, accidentally dropping a wrench that connects the negative terminal to the chassis wouldn’t cause a spark — since the negative is already connected to ground. This is why the positive terminal often has a protective cover and why careful handling of anything attached to the positive side is so important.
Understanding which terminal is which also matters for jump-starting and battery replacement. Connecting the cables to the correct polarity is absolutely critical — reversing them even momentarily can damage electrical components. In the next section, we cover safe practices to handle battery connections correctly.
Safe Practices for Handling Battery Connections
Working with car batteries can be safe and straightforward if you follow proper procedures. Here are some essential tips for connecting or disconnecting a car battery and jump-starting a vehicle, with the polarity of the terminals in mind:
Safety first: Turn off the engine and remove the keys before touching the battery. Wear eye protection and gloves, as car batteries contain corrosive acid and can emit flammable gas. Remove any metal jewelry to prevent accidental shorts.
Disconnect negative first when removing a battery: Loosen the nut and remove the negative (–) cable first, then the positive (+) cable. The negative terminal is disconnected first to eliminate the risk of your tools causing a short from positive to ground while you work.
Connect positive first when installing a battery: Attach and tighten the positive (+) cable first, then the negative (–) cable. This sequencing is the reverse of removal and ensures that the ground is connected last to minimize sparking. (In summary: when disconnecting, go negative-off, positive-off; when connecting, go positive-on, then negative-on.)
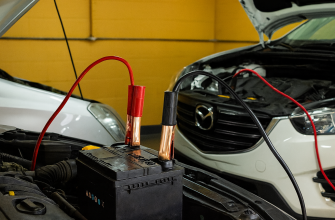
Jump-starting precautions: When using jumper cables to start a dead battery, always connect the red cable to the positive (+) terminals on both batteries first. Then connect one end of the black cable to the negative (–) terminal of the good battery. Attach the other black clamp to a metal ground point on the disabled car (such as an unpainted bolt on the engine block) — not to the dead battery’s negative terminal. This is done because a spark may occur when completing the circuit; you want that spark away from the battery itself to avoid igniting any hydrogen gas that the battery may emit. Once the cables are secured, start the working car, then the dead car. Remove the cables in reverse order: first black (negative) from the grounded metal and the good battery, then red (positive) from both batteries.
Never mix up the terminals: Double-check all connections against the “+” and “–” markings before turning power on. If you ever accidentally connect positive to negative, remove the connection immediately — cross-polarity surges can fry electronics and cause battery damage.
Consult your owner’s manual: If anything is unclear, refer to the vehicle’s manual for the manufacturer’s recommended procedure. Modern cars sometimes have specific jump-start or battery change instructions, and some even provide dedicated jump start terminals under the hood. When in doubt, professional guidance is the safest bet.
Following these steps will help you avoid common mistakes such as sparks, blown fuses, or even battery explosions. For example, connecting the negative jumper cable to the disabled car’s battery negative post is a known hazard: “Doing so can create sparks that ignite the hydrogen fumes from the battery,” warns one automotive guide. Keeping the order of operations in mind (negative-off first, positive-on first) and respecting the battery’s polarity will make your work with car batteries much safer and more effective.
Summing Up: Positive and Negative at a Glance
In conclusion, knowing which terminal is positive and which is negative on your car battery is a fundamental piece of knowledge for any driver. A quick recap: look for the “+” sign (often under a red cover) for the positive terminal, and the “–” sign (usually uncovered or black) for the negative terminal. Understanding these distinctions helps you connect jumper cables correctly, replace your battery safely, and avoid costly mistakes. In a region like Dubai, where high temperatures can shorten battery life, drivers often find themselves dealing with battery issues — making it even more important to handle batteries confidently and correctly. By following the identification tips and safety practices outlined above, you can ensure that when you work with your car’s battery, you’ll stay safe and keep your vehicle’s electronics protected. Battery care is a simple skill that pays off in reliability, safety, and peace of mind on the road.
Khalid Wheels
Dubai car blogger.
Supercars • Repairs • Real Talk.
Speed meets spanners.